Ultimaker Cura Intent profiles
Ultimaker Cura, with its 400+ settings, can be a challenging tool to learn and master. While some users enjoy fine-tuning settings to perfect their technique, others are more interested in simply getting a good print, much like printing a document from a home printer.
Despite significant advancements in 3D printing over the last decade, the technology is still not as user-friendly as traditional paper printing. This is not just due to technological limitations but also because 3D printing is highly versatile, capable of producing anything from quick mockups to aesthetic parts and even functional mechanical components.
To help users achieve the results they need without navigating hundreds of settings, Joost Kuitert, during his master’s thesis, conceptualized “Intent Profiles.” These are specialized print profiles tailored for specific purposes, or “intents.” For example:
- Engineering Intent: For strong parts with high dimensional accuracy.
- Draft Profile: For fast prints to quickly verify a design concept.
- Visual Profile: For decorative prints where surface finish is prioritized over strength. Intent Profiles were introduced in Cura 4.4 as part of the recommended print settings panel, streamlining the process for users.
When I took over the UX design for Cura around version 4.8, I began reaching out to users and customers to understand how they were using the software. I quickly noticed that very few people stayed within the recommended settings, even novice users. Many were delving into advanced settings, tweaking options that should generally be left alone unless you have in-depth knowledge.
Unfortunately, these bad habits—often encouraged by YouTube tutorials—didn’t lead to great results. Users would change more and more settings, trying to find a combination that worked. So why were so many users putting in so much effort only to get suboptimal results? Several factors contributed to this issue:
- The default intent profiles shipped with Cura were not perfectly tuned.
- The recommended settings had a very limited number of options, forcing users into custom settings even for simple adjustments.
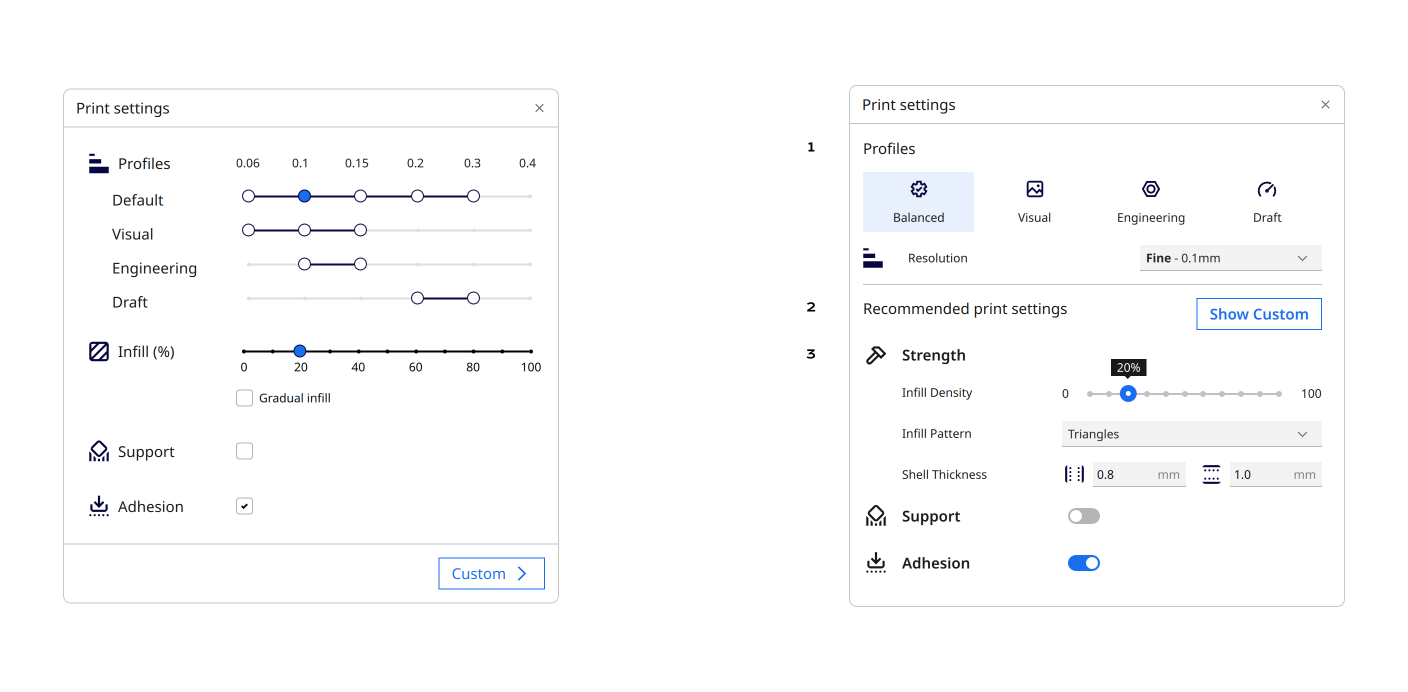
- The multi-dimensional slider, designed to let users choose intent and layer height in one click, was confusing, especially for first-time users.
While the first issue was eventually addressed by 3D printing engineers who optimized the intent profiles for better quality, I pushed for a redesign of the recommended settings panel to solve issues #2 and #3. The goal was to increase the number of users who would remain within the comfort of the recommended print settings, improving their overall experience.

Simplified Selection Process:
The new recommended print settings panel was completely restructured to address the critical issues identified earlier:
Simplified Selection Process:
- The previous matrix was replaced with a two-step selection process. First, users choose an intent or profile set, and then they select a resolution.
- The intent selection is now more prominent in the UI, with large tab buttons featuring icons for better visibility.
- The resolution drop-down menu is clearly labeled to communicate its purpose.
Separated profile selection from settings:
- We introduced a clear separation between the profile selection and the settings/tuning sections, helping users focus on one decision at a time.
- All Strength-related settings have been grouped together to simplify navigation.
Expanded Settings Options:
- The settings section now includes a few more frequently adjusted options that don’t significantly impact print quality like infill pattern and Shell thickness.
This new design was introduced in Cura 5.5 and rolled out to all Ultimaker printer users.